First in our tutorial, we'll take on Netscape's Object Signing Tool that can be used to sign Java code (among other things). As in all of these systems, step one is obtaining an identity.
Most digital signature schemes (PGP being a notable exception) involve the use of a Certificate Authority (CA)-an organization that can vouch for someone's signature. After all, why trust code just because it carries a signature? We need an objective third party to make sure people are who they say they are. That means the first task in code signing is to obtain the proper credentials from a CA. There are many CAs that can sell you certificates for signing Java code. Netscape has links to CAs that support their Netscape Object Signing Tool at https://certs.netscape.com. You can visit that page and pick a CA. Make sure that the CA you choose provides a certificate that can be used to sign objects (some certificates can't). VeriSign offers many flavors of Digital IDs. It heads up Netscape's list of CAs. We'll use VeriSign as an example for obtaining a certificate; however, note that the process will differ depending on the CA that you choose. To get a VeriSign certificate for Netscape Object Signing, select Software Developer ID from the popup list at the top of VeriSign's homepage. Choose Netscape Object Signing from the page that follows. There are two kinds of Software Developer IDs: a Class 2 Individual ID, and a Class 3 Commercial ID. The Class 2 ID costs $20 annually, while the Class 3 ID is a whopping $400 annually. For our purposes, we'll focus on Class 2 certificates. After selecting Class 2, fill out the information form that asks who will be identified by the certificate (making sure to include the all-important billing information). VeriSign will do a limited background check on you before it will issue a certificate. For example, it checks the data you enter against information publicly available on you through a credit check. If your request for a certificate is accepted, VeriSign will email you a PIN and a URL that you can use to retrieve the certificate. For an individual Class 2 certificate, the verification process is usually close to instantaneous. Once you receive that information, open the URL with Netscape Communicator and then enter your PIN. Communicator will install the certificate in itself automatically. If you are using a shared version of Communicator, someone may have already entered a password for the certificate database that is stored in your browser. You will need this password before you can download and install your certificate; otherwise, you will be prompted to enter a password for the certificate database. Although this password is optional, it does prevent people from starting up your version of Netscape and stealing your certificate by exporting it. You definitely don't want your certificate stolen, because then other people can sign applets as you. Password information can be found in the Security Info box of the Communicator menu, under Passwords. If everything is successful, your certificate will appear in the Security Info box; check by going to Yours under Certificates. There are several things to know as you sign up for a certificate:
It is a good idea to export your certificate to a file, just in case you install a new version of Communicator over your old one. Doing so also allows your certificate to follow you to other machines. To export a certificate, bring up Communicator's Security Info dialog box. Select the certificate you wish to export by clicking on its name. Then, click on the Export button. At this point, you may be asked to enter the password that protects your local browser's certificate database. Next, you will be asked to enter a password to protect the certificate data. This password is used to make sure that no one can steal your certificate if he or she sees an exported copy of it somewhere (unless that person is able to crack your password, so choose wisely!). To make sure you typed the password in correctly, you will be asked to enter it again. Assuming you've entered the same password both times, Netscape will prompt you for a filename, which it will use to store the certificate. Once you enter the filename, you're finished exporting the certificate. You can copy that file to another machine so you can sign code from there as well. To import a certificate into a new browser, bring up Communicator's Security Info box. Click on Yours, which is a subitem of Certificates. Press the button, Import a Certificate. If you have not previously entered the password protecting the certificate database of the local copy of Netscape, you will now be prompted to enter it. After you enter the correct password, a file dialog box will come up; use it to select the file containing your certificate. Once you have selected the file, you will be prompted for the password used to protect the certificate, which is the password that you entered when you exported the certificate. At this point, assuming all has gone well, you should get a dialog box indicating success.
The Netscape Object Signing Tool is a command line program that creates digital signatures for files. These signatures aren't stored in the files themselves; they're stored in the JAR file in which you bundle your applet. Note that since digital signature information is transmitted in JAR files, you must package your applets in a JAR file in order to sign them, even if they consist only of a single class. The important syntax for using a JAR file with the HTML APPLET tag is:
<APPLET CODE="somefile.class" ARCHIVE="jarfile.jar"> where somefile.class is the class in the JAR file where execution should begin, and jarfile.jar is the URL of the JAR file. The Netscape Object Signing Tool may be downloaded from developer.netscape.com/software/signedobj/jarpack.html. The tool is available for most operating systems. While, as of this writing, version 1.0 is still available for download, we recommend that you use version 1.1. After the download is complete, unpack the archive file in a directory. Included are three files: readme.txt, license.txt, and signtool. To make signing objects easier, put the directory that contains signtool in your PATH environment variable, as per your operating system. For example, a Windows 95 user who unpacked the tool to C:\nos would run the following line (and then add it to the autoexec.bat file):
Before attempting to sign anything, check to see if signtool is able to locate the certificate that will be used to sign objects. Unix flavors of signtool look for certificates in the $HOME/.netscape. If your local Netscape files are kept somewhere else, or if you are using the Win32 version, signtool must be explicitly told the path to the certificates. This is done with the -d flag. On Win32, this path is commonly c:\Program Files\Netscape\Users\name, where name is the name of your Netscape Profile. To verify that your signing certificate was installed properly, run signtool -l or, if your certificate cannot be found,
For example, if your certificates were stored in C:\nos, you would type:
If your certificate still does not appear in the listing, verify that the certificate is installed in Netscape properly. (See the instructions given earlier). Also check that the path to the Netscape .db files was properly specified. If all else fails, check with Netscape and the issuing Certificate Authority. Make note of the full name of your certificate as it appears in the listing, you will need these data when it comes time to sign.
Create a directory in which to put all the class files for the applet you wish to sign. Once all the class files that make up the applet are in the right place, the signtool program can create a signed JAR file in one step.
Navigate into the directory containing the soon-to-be signed classes. To sign the classes and create a JAR file in one step, issue the command:
If your Communicator Certificate Database is password protected, signtool will prompt for the password before signing the classes. The "." at the end of the command should be the last thing to appear. It specifies that the signing should begin in the current working directory. The signtool command recursively signs files by default. To keep the tool from recursing through directories, add --norecurse to the command line.
Here's a brief explanation of the flags used in the previous example, as well as some of the other more useful flags for signing applets:
-e".extension": Specifies the file extensions to sign. If you don't include this flag, the tool will sign all files, as opposed to the preceding example, which uses this flag to sign .class files only.
-x"name": Allows you to sign all files except a particular file or directory. An example where this might be useful is when you are using an untrusted library in your applet. You probably will not want to vouch for code you did not write!
-Z"jarfile": Specifies the name of the JAR file to create. If you omit this option, you will have to JAR everything up yourself.
When the JAR file is created, signtool can be used to test the validity of the signatures. This is done by issuing the command:
signtool will list the contents of the JAR and verify that they have been signed, and that they have not been tampered with since the signature was created.
You may also check to see who signed the JAR file:
signtool can be used to sign anything, not just Java files. In fact, it can extract JavaScript from HTML files, and sign just the JavaScript; however, that functionality is outside the scope of this tutorial. Documentation on signtool is available from Netscape at developer.netscape.com/docs/manuals/signedobj/signtool/.
As Chapter 3 describes, signing a Java applet does much more than just allow people to verify that you signed it. It can also give your applets the chance to step outside the Java sandbox. If your applet has a digital signature vouching for it, then the applet may request special privileges, such as accessing the file system. However, the user of the applet doesn't have to let your applet do what you request just because you sign it.
The special privileges an applet can request are called capabilities by Netscape.1 Predictably, no two browsers support flexible privileges in quite the same way, so privilege-management code will only work with one browser. (So much for "write once, run anywhere"!) As a result, while Netscape keeps its own internal version of these classes, in order to actually compile and test an applet that can request them, you must download the library from developer.netscape.com/ docs/ manuals/signedobj/capsapi_classes.zip
Put the zip file in your CLASSPATH (or otherwise edit the CLASSPATH). Now you will be able to develop code that requests extra privileges in Netscape. Note that you should not include these classes with your applet; the Netscape browser running on the remote machine will use its internal version of the classes.
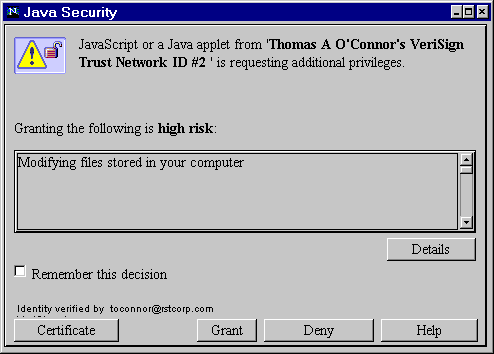
The Capabilities library provides a class called the Privilege Manager that handles requests from the program to turn on and off privileges. When the first request to enable a certain privilege is made, the Privilege Manager prompts the browser's user, showing the certificate used to sign the code requesting the privilege, and asking whether the privilege should be granted. See Figure C.1. If the user agrees to grant the privilege, the privilege is granted for the lifetime of the applet. However, once the applet has obtained a privilege, it can turn the privilege off and on at its discretion.
To request a particular privilege to be enabled, you use the static method enablePrivilege() of class netscape.security.PrivilegeManager. The method takes a single String argument, which is the name of the privilege to enable. Some useful privileges include:
UniversalSendMail: This privilege allows the applet to send email on behalf of the user.
UniversalExitAccess: Allows the Java applet to shut down the Netscape browser.
UniversalExecAccess: Enables the applet to run programs already stored on the user's local computer.
PrivateRegistryAccess: Grants access to application-specific portions of the computer's registry (Win32 only).
There are many more privileges that an applet can request. For a full list, see the documentation for the Capabilities API at developer.netscape.com/docs/manuals/signedobj/capabilities/01cap.htm.
A call to enablePrivilege will throw an exception that the applet must catch if the user decides not to grant the privilege specified in the call. Thus, the applet must be prepared to catch instances of netscape.security.ForbiddenTargetException.
Here's a sample applet called FirstTry.java that uses enablePrivilege
The FirstTry applet doesn't do anything with the privilege it asks for, even if it is granted. However, it would be able to read any file, including the system password file on a Unix system, if it tried. That could be considered an abuse of privilege. Another potentially bad thing this applet could do would be to put the enablePrivilege call inside the paint method. Doing this will cause the browser to continually prompt the user for permission every time paint is called, which will happen until permission is granted, or until the browser is killed. Actually, the Netscape Grant/Deny window has a checkbox that says "Remember this decision." Checking the deny box will make this pop-up never appear again. The take home message is that signed applets can be hostile too.
When you enable a privilege, it does not have to stay enabled for the entire execution of the applet. There are a couple of ways to turn privileges off (which is always a good idea). First, when the method that calls enablePrivilege returns, the privilege will automatically be disabled. As a result, you should not use a helper method to enable a privilege, because once execution returns from that method, the privilege will no longer be enabled. Second, you can call revertPrivilege, which also takes the name of a privilege as an argument. Finally, you can call disablePrivilege, which turns off a particular privilege. In no case will the granting of the privilege be revoked; the applet can turn the privilege back on by simply calling enablePrivilege again. To see an example of a signed applet, surf to www.securingjava.com/dpig/netscape.html.
Chapter... Preface -- 1 -- 2 -- 3 -- 4 -- 5 -- 6 -- 7 -- 8 -- 9 -- A -- B -- C -- Refs
Copyright ©1999 Gary McGraw and Edward Felten. |